Hey friends! Today I’m sharing my FAVORITE lemon dessert ever – these amazing Lemon Cheesecake Squares! They’re super yummy with the perfect mix of sweet and tangy!

WHY I LOVE THESE SO MUCH
Okay, so I have a confession… I’ve never really liked regular lemon bars.
I know, weird right? Especially since I’m totally obsessed with anything lemon-flavored! But every time I tried regular lemon bars, I was always like “meh.” They were either too gooey or just didn’t have enough flavor for me.
But then I tried THESE lemon cheesecake squares and OMG! Total game changer!
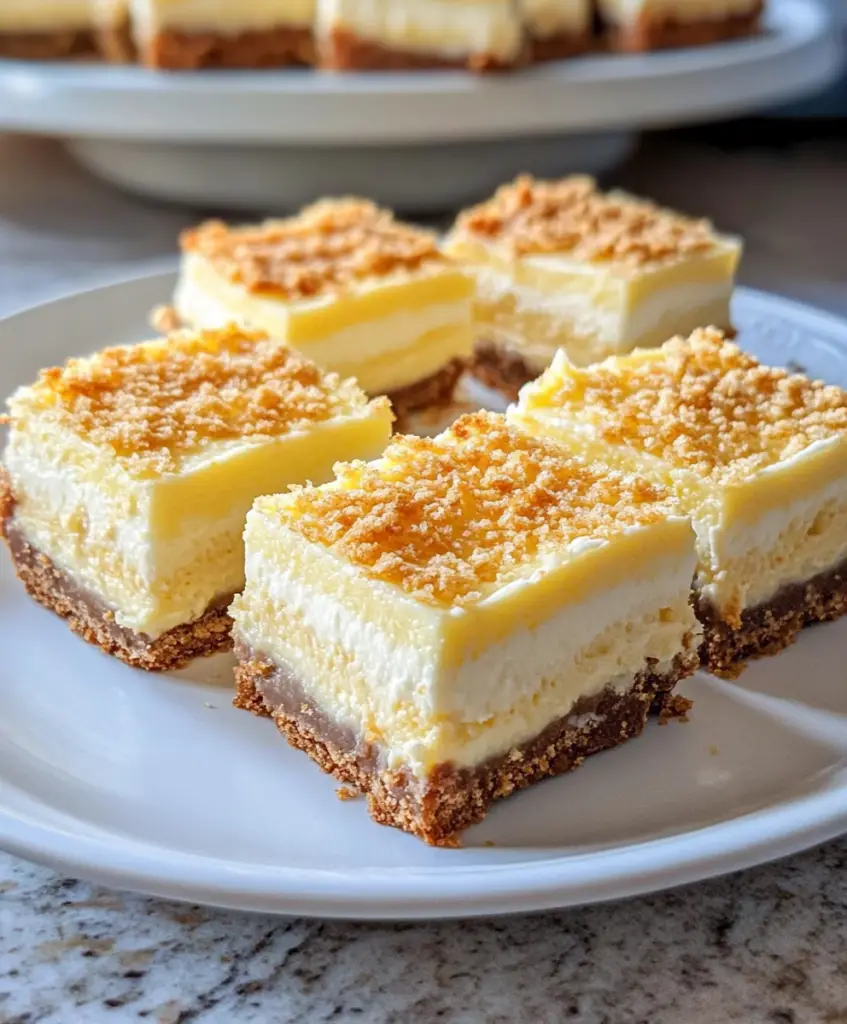
What makes these so special is that they have THREE awesome layers. There’s a buttery shortbread crust on the bottom (yum!), then a creamy cheesecake layer in the middle, and finally that bright, tangy lemon layer on top. When you take a bite with all three layers? Heaven!
I made a batch last weekend when my family came over, and they were GONE in like 20 minutes! My sister even texted me the next day asking for the recipe!
HOW TO MAKE THEM (IT’S EASIER THAN YOU THINK!)
Don’t worry – these bars look fancy but they’re actually pretty simple to make! We just do one layer at a time:
The Bottom Layer (Shortbread Crust)
First, we make the shortbread crust. Just mix flour, cornstarch, sugar, butter, and some lemon zest until it looks like crumbly sand. I use a pastry cutter thing, but honestly, your fingers work just fine too!
Press this mixture into your pan. Really push it down so it’s nice and firm! Then bake it for about 15 minutes until it starts to look a little golden.
I love that this crust has lemon zest in it – it makes the whole thing taste lemony from top to bottom!
The Middle Layer (Cheesecake)
While your crust is baking, beat together the cream cheese, sugar, and egg until it’s smooth and creamy. Make sure your cream cheese isn’t cold from the fridge or you’ll get little lumps!
When your crust comes out of the oven, pour this cheesecake mixture right on top while it’s still warm. Pop it back in the oven for about 10-15 minutes. We want the top to set just a little bit before adding the lemon layer.
The Top Layer (Lemon)
Now for the best part – the lemon layer! Just whisk together eggs, sugar, flour, and lemon juice. If you can use fresh lemons instead of the bottled juice, it tastes SOOO much better!
Pour this gently over your cheesecake layer, trying not to mess it up too much. Then back into the oven for another 25-30 minutes until the top looks set.
The hardest part is waiting for them to cool! They need at least 3 hours in the fridge, but I usually make them at night and let them chill until the next day. I know it’s hard to wait, but it’s totally worth it!
MY BEST TIPS FOR YOU
Make sure your stuff is room temperature: Take your eggs and cream cheese out of the fridge early! Cold cream cheese = lumpy cheesecake layer.
Use parchment paper: It makes it SO much easier to lift everything out of the pan when it’s done.
Don’t rush! Each layer needs its own time to bake properly. If you rush, your layers might all mix together (still tasty, but not as pretty!).
For really neat squares: Wipe your knife clean after each cut. Or run it under hot water and dry it off for super clean slices.
Make them ahead: These are perfect for making a day or two before a party. One less thing to worry about on the day!
HOW TO STORE THEM
These squares stay good in the fridge for about 2-3 days in a covered container. But honestly, they never last that long at my house!
Want to keep them longer? Throw them in the freezer! Just put wax paper or parchment between layers so they don’t stick together. They’ll stay good for about 3 months.
My favorite way to eat the frozen ones? Let them thaw for like 10 minutes (not completely) – they’re actually amazing when they’re still a little bit frozen, especially in the summer!

Lemon Cheesecake Squares
Ingredients
Method
- Heat your oven to 350°F. Grease a 9×9-inch baking pan and line the bottom with parchment paper.
- Make the crust: Mix the flour, cornstarch, sugar, butter, and lemon zest until it looks like crumbly sand. Press this firmly into your prepared pan. Bake for 15 minutes until lightly golden. Take it out but leave the oven on.
- Make the middle layer: Beat the cream cheese and sugar until it’s fluffy (about 3-4 minutes). Add the egg and beat until smooth. Pour this over your warm crust.
- Put it back in the oven for 10-15 minutes, just until the top sets a little bit. Take it out but leave the oven on.
- Make the lemon layer: Whisk together the eggs, sugar, flour, and lemon juice. Gently pour this over the cream cheese layer, trying not to disturb it too much.
- Bake again for 25-30 minutes until the center is just set (it shouldn’t be jiggly).
- Let it cool at room temperature, then put it in the fridge for at least 3 hours (overnight is even better).
- Before serving, you can sprinkle some powdered sugar on top if you want. Cut into squares and enjoy!
Notes
- If your cream cheese is still cold, microwave it for 15-20 seconds so it gets soft enough to mix smoothly.
- Fresh lemon juice tastes WAY better than bottled in this recipe!
- These freeze really well for up to 3 months. Just wrap them up tight or put them in a container with layers of wax paper between them.
- The powdered sugar on top is optional but makes them look extra pretty!