These Homemade Crunch Bars are so crispy and delicious! You can make these chocolate treats so quickly and there’s no need for store-bought candy bars!
BETTER THAN THE ORIGINAL WITH JUST 5 INGREDIENTS
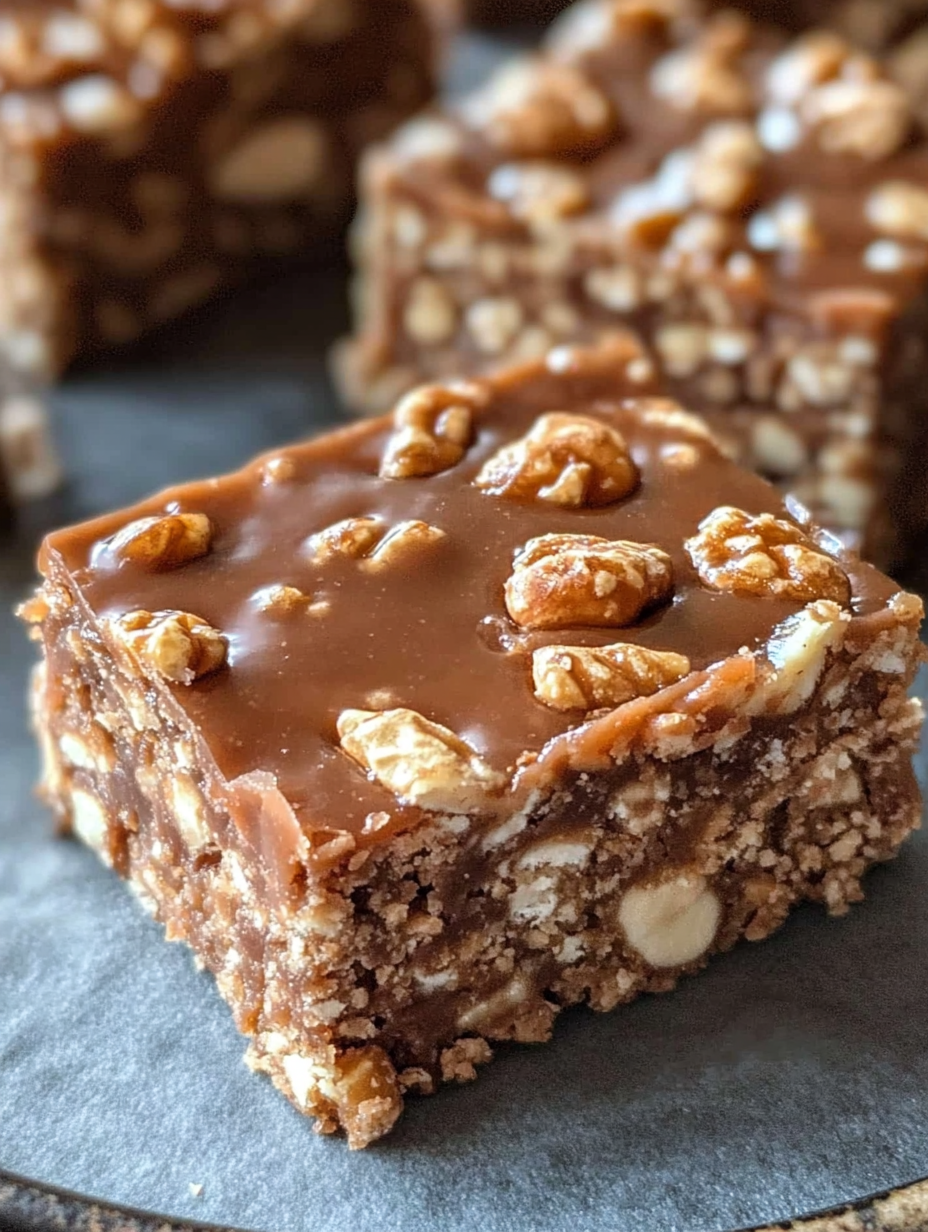
Homemade Crunch Bars are the perfect way to make an irresistible treat with minimal effort! This recipe is wonderfully simple, requiring just five basic ingredients and barely any prep time. You don’t need to wait for a special occasion to enjoy these crispy, chocolatey delights!
When Nestle announced they were discontinuing Crunch bars back in 2018, I was determined to create a homemade version that wasn’t just as good as the original – but even BETTER! And that’s exactly what we have here, plus it’s relatively healthier than the traditional candy bar.
You might find other homemade crunch bar recipes online, but many call for just melted chocolate and crispy rice cereal. Is that technically a crunch bar? Yes. But taste-wise, it’s very average. My version adds a few extra ingredients that make all the difference in flavor and texture!
FREQUENTLY ASKED QUESTIONS:
What makes these better than other homemade crunch bar recipes? Most recipes just mix chocolate with cereal, which is fine but lacks depth. My version includes peanut butter for creaminess and richness, maple syrup for subtle sweetness, and coconut oil for that perfect texture. These additions create a more complex flavor profile that truly elevates these bars above basic chocolate and cereal combinations.
Can I make these completely sugar-free? Absolutely! Simply swap the regular chocolate chips for your favorite sugar-free baking chips (don’t use melted sugar-free candy bars as they won’t set properly), and replace the maple syrup with a good quality sugar-free maple alternative. While the flavor won’t be identical to the original, it’s still incredibly delicious!
Why do my bars sometimes get too soft at room temperature? This can happen if your kitchen is particularly warm. The coconut oil in the recipe has a lower melting point than other fats. If you find your bars getting too soft, you can either store them in the refrigerator or try reducing the coconut oil to 3 tablespoons instead of 1/4 cup.
How can I get clean cuts when slicing the bars? For perfect cuts, chill the bars thoroughly (at least 2 hours), then use a sharp knife dipped in hot water and wiped dry between cuts. This helps the knife glide smoothly through the chocolate without cracking or crumbling the bars.
Can I add other mix-ins to these bars? Definitely! Small additions like mini chocolate chips, chopped nuts, or even a sprinkle of sea salt on top can take these bars to the next level. Just be careful not to add too many extras, as this can prevent the bars from holding together properly.
INGREDIENTS NEEDED:
- crispy rice cereal – provides that essential crunch factor that these bars are famous for. Make sure to use a fresh box for maximum crispiness! I recommend gluten-free crispy rice cereal if you have gluten sensitivities.
- peanut butter – adds creaminess and that irresistible nutty flavor that pairs so perfectly with chocolate. I prefer using crunchy peanut butter for extra texture, but smooth works great too! For those with allergies, crunchy sunflower seed butter or soynut butter make excellent substitutions.
- chocolate chips – choose high-quality chocolate for the best flavor. I use dairy-free chocolate chips to keep these vegan, but any good baking chocolate will work wonderfully. The better your chocolate, the better your bars!
- maple syrup – provides natural sweetness and helps bind everything together. The flavor also adds depth that plain sugar can’t match. If you need a sugar-free option, there are several good maple syrup alternatives available.
- coconut oil – gives these bars that perfect melt-in-your-mouth texture. You can substitute with butter or vegan butter if preferred, but coconut oil creates the best consistency.
HOW TO MAKE HOMEMADE CRUNCH BARS
Start by lining an 8×8-inch baking dish with parchment paper, making sure to leave some overhang on the sides for easy removal later. This simple prep step saves so much time with cleanup!
Pour your crispy rice cereal into a large mixing bowl and set it aside. Using a bowl that’s bigger than you think you need makes folding in the chocolate mixture much easier and less messy.
In a microwave-safe bowl or small saucepan, combine the peanut butter, chocolate chips, maple syrup, and coconut oil. If using the microwave, heat in 30-second intervals, stirring between each, until everything is completely melted and smooth. On the stovetop, use low heat and stir constantly to prevent scorching.
Once melted, give the chocolate mixture a good whisk until it’s silky smooth and completely combined. This should only take about 30 seconds of vigorous whisking.
Pour this chocolate mixture over the crispy rice cereal and gently fold everything together using a rubber spatula. Keep folding until every piece of cereal is evenly coated with the chocolate mixture. Take your time with this step – thorough mixing ensures consistent texture throughout your bars.
Transfer the mixture to your lined baking dish and use the spatula to press it down firmly and evenly. Getting a smooth, compact layer is key for bars that hold together well when cut.
Refrigerate until completely firm, which takes at least an hour. For the best results, I like to leave mine in the refrigerator for about 2 hours or even overnight if I’m planning ahead.
Once firm, use the parchment paper overhang to lift the entire block out of the baking dish and onto a cutting board. With a sharp knife, cut into bars or squares of your preferred size.
Enjoy immediately or store according to the directions below. These bars are perfect for satisfying your sweet tooth any time of day!
Homemade Crunch Bars
Ingredients
- 3 cups crispy rice cereal
- 1 cup peanut butter crunchy or smooth
- 1½ cups chocolate chips dairy-free if needed
- ½ cup maple syrup
- ¼ cup coconut oil
Instructions
- Line an 8×8-inch baking dish with parchment paper, leaving some overhang on the sides for easy removal later.
- Add crispy rice cereal to a large mixing bowl and set aside.
- In a microwave-safe bowl or small saucepan, combine peanut butter, chocolate chips, maple syrup, and coconut oil.
- If using the microwave, heat in 30-second intervals, stirring between each, until completely melted and smooth. If using the stovetop, heat over low heat, stirring constantly until melted.
- Pour the chocolate mixture over the crispy rice cereal and fold gently but thoroughly until all cereal is evenly coated.
- Transfer the mixture to the prepared baking dish and press down firmly to create an even layer.
- Refrigerate until completely firm, at least 1 hour.
- Once firm, lift out of the pan using the parchment paper overhang and cut into bars on a cutting board.
- Serve and enjoy!
Notes
Storage Tips
- ROOM TEMPERATURE: These crunch bars can be stored in a sealed container at room temperature for up to 2 weeks in cooler climates. If your home is warm, they may become too soft.
- REFRIGERATOR: For firmer bars or in warmer environments, store in the refrigerator in an airtight container for up to 3 weeks.
- FREEZER: Wrap individual bars in parchment paper and place in freezer bags. They will keep well frozen for up to 6 months. Thaw at room temperature for 15-20 minutes before enjoying.
Recipe Notes
- For extra crunch, try using crunchy peanut butter instead of smooth.
- Make sure to press the mixture firmly into the pan for bars that hold together well.
- For a fun variation, sprinkle some extra cereal on top before refrigerating for more texture.
- These taste even better the next day after the flavors have had time to meld!
- For a peanut-free version, substitute sunflower seed butter or almond butter.