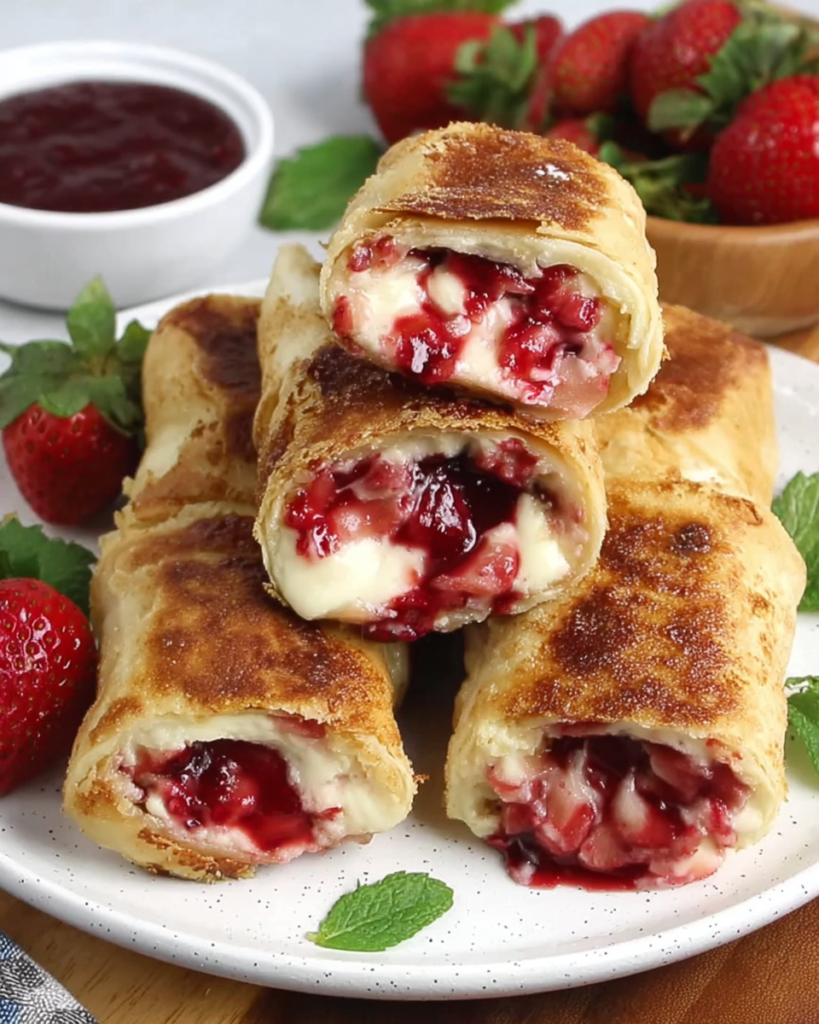
These Strawberry Cheesecake Chimichangas are a warm, crispy dessert filled with a sweet and creamy cheesecake filling and a fresh strawberry topping — all wrapped up in a golden, pan-fried tortilla and finished with a dusting of cinnamon sugar. They are so easy to make and absolutely irresistible!
A Deliciously Easy Chimichanga Dessert Recipe
One of my absolute favorite desserts (besides my Cinnamon Roll Cake) are chimichangas — and this dessert version is no exception. This is one of those recipes that everyone loves, even picky eaters! The creamy cheesecake filling paired with sweet strawberries inside a perfectly crispy tortilla is just so warm and comforting, and it comes together pretty quickly. It’s the kind of dessert you can whip up on a weeknight and it feels a little bit fancy without much effort at all!
I’ve made this a few times now and it is always a huge hit at the table. The first time, I was nervous about the frying part, but your instructions made it so simple and straightforward. My kids devoured every single one. This is going into my regular rotation for sure!
– Carrie
Frequently Asked Questions
Can I use frozen strawberries instead of fresh?
Yes, absolutely! Just make sure you thaw them completely and drain off as much of the excess liquid as possible. Too much moisture can make the filling runny and cause the tortillas to get soggy. Fresh strawberries will give you the best flavor and texture here, but frozen work just fine in a pinch.
Can I bake these instead of frying them?
Yes! If you prefer to bake them, place them seam-side down on a greased baking sheet. Brush or spray the tops with a little melted butter and bake at 400°F for about 20-25 minutes until golden and crispy. They won’t be quite as golden and crispy as the pan-fried version but they are still delicious.
Can I use a different fruit filling?
Of course! This recipe is very easy to customize. Blueberries, raspberries, peaches, or even a can of cherry pie filling all work wonderfully here. Use whatever fruit your family enjoys most — or whatever is in season!
Can I make these ahead of time?
You can absolutely make the cheesecake filling a day ahead and store it covered in the refrigerator. I would recommend assembling and frying them right before serving so the tortillas stay nice and crispy. Nobody wants a soggy chimichanga!
Can I use flavored cream cheese?
Yes! If you can find a strawberry cream cheese, go ahead and use it. It just doubles down on that strawberry flavor. Plain cream cheese is what this recipe calls for but feel free to experiment with what you enjoy.
How do I store leftover chimichangas?
Allow them to cool completely then store them in an airtight container in the refrigerator for up to 3 days. To reheat, pop them in the air fryer at 350°F for a few minutes or in the oven to help bring back some of that crispiness. I don’t recommend the microwave as it will make the tortilla soft and a bit chewy.
Can these be frozen?
Yes! These freeze really well. Allow them to cool completely and then wrap each one individually and place them in a freezer-safe bag or container. They will keep for up to 3 months. Reheat from frozen in the oven or air fryer. I’d skip the cinnamon sugar coating until after you reheat them so it stays nice and fresh.
Ingredients Needed: (See Recipe Card Below for the Full Recipe)
- cream cheese — make sure this is softened to room temperature before you start. Cold cream cheese will not mix smoothly and you’ll end up with lumps in your filling. Set it out about 30 minutes before you begin.
- powdered sugar — this sweetens the cheesecake filling and keeps it silky smooth. Granulated sugar can leave a slightly gritty texture so I really do recommend sticking with powdered sugar here.
- vanilla extract — use pure vanilla extract if you can. It just gives you the best flavor in the filling.
- sour cream — this adds a little tang to the cheesecake filling which really makes it taste like the real deal. You could substitute with plain Greek yogurt if you prefer.
- fresh strawberries — diced small so they fit nicely inside the tortilla. You can also use strawberry jam or preserves in a pinch, but fresh is really the way to go here for texture and flavor.
- granulated sugar — just a small amount to toss with the strawberries so they get a little jammy and sweet.
- flour tortillas — use medium-sized flour tortillas (about 8-inch). You want them to be pliable and soft so they roll up without cracking or tearing.
- vegetable oil — for pan frying. You don’t need a ton — just enough to come up about half an inch in your skillet. Canola oil works just as well.
- granulated sugar and cinnamon — combined together for that gorgeous cinnamon sugar coating that goes on right after frying. This is what really makes these taste like a proper chimichanga dessert!
- whipped cream or vanilla ice cream — completely optional but highly, highly recommended for serving!

How to Make Strawberry Cheesecake Chimichangas
In a medium bowl, beat the softened cream cheese with a hand mixer until it is smooth and fluffy. Add the powdered sugar, vanilla extract, and sour cream and mix until everything is completely combined and creamy. Set filling aside.
In a small bowl, toss the diced strawberries together with the granulated sugar. Let them sit for about 5-10 minutes. This draws out a little of their natural juice and sweetens them up beautifully.
Lay your flour tortillas out flat on your work surface. Spoon about 2-3 tablespoons of the cream cheese filling down the center of each tortilla, leaving a border around the edges. Top the filling with a spoonful of the sweetened strawberries. Don’t overfill them or they will be really hard to roll up!
Fold in the sides of the tortilla, then roll up from the bottom tightly, just like a burrito. Secure with a toothpick if needed to keep them closed while frying. Repeat with remaining tortillas.
In a large skillet, heat about a half inch of vegetable oil over medium heat. You’ll know it’s ready when you dip the edge of a tortilla in and it starts to sizzle right away. Carefully place the chimichangas seam-side down into the hot oil. Fry for about 2-3 minutes per side, turning carefully, until all sides are deep golden brown and crispy. Work in batches so you don’t crowd the pan.
While the chimichangas are frying, combine the granulated sugar and cinnamon in a shallow bowl or on a plate. As soon as each chimichanga comes out of the oil, roll it immediately in the cinnamon sugar mixture. The heat helps it stick and forms that incredible crust. Remove toothpicks before serving. Serve warm with whipped cream or a scoop of vanilla ice cream!
Pro Tips for the Best Strawberry Cheesecake Chimichangas
- Softened cream cheese is non-negotiable. I cannot stress this enough! If your cream cheese is cold, your filling is going to be lumpy no matter how long you mix it. Set it out on the counter for at least 30 minutes before you start.
- Don’t skip the cinnamon sugar coating. This step takes about 30 seconds and it makes a world of difference. Roll them immediately when they come out of the oil while they are still hot and glistening so the cinnamon sugar sticks properly.
- Keep your oil temperature steady. If your oil is too hot, the outside will burn before the tortilla is fully crispy. If it’s too cool, the chimichangas will absorb too much oil and come out greasy. Medium heat is your sweet spot here. A small sizzle when the tortilla hits the oil tells you you’re right where you need to be.
- Don’t overfill! I know it is tempting to pile in as much filling as possible but overstuffed chimichangas will burst open in the oil. Two to three tablespoons of filling and a spoonful of strawberries is really all you need.
- Work in batches. Give your chimichangas some breathing room in the skillet. Crowding the pan drops the oil temperature and leads to uneven cooking. Two or three at a time is ideal depending on the size of your skillet.
What to Serve with Strawberry Cheesecake Chimichangas
These are absolutely delicious on their own but if you really want to take them over the top, serve them with a generous scoop of vanilla ice cream or a big swirl of whipped cream. A drizzle of strawberry sauce or even some chocolate syrup on top is also really good! For a little extra freshness, a few slices of fresh strawberry alongside each plate makes for a really pretty presentation too.
How to Store Leftover Strawberry Cheesecake Chimichangas
Allow your chimichangas to cool completely before storing. Place them in an airtight container and store in the refrigerator for up to 3 days. To reheat and bring back that crispy exterior, pop them in the air fryer at 350°F for 3-4 minutes or in the oven at 375°F for about 8-10 minutes. I really don’t recommend the microwave here because the tortilla gets soft and chewy and loses that wonderful crunch.

Strawberry Cheesecake Chimichangas
Ingredients
Method
- In a medium bowl, beat the softened cream cheese with a hand mixer on medium speed for about 1-2 minutes until completely smooth and fluffy. Add the 1/2 cup powdered sugar, 1 teaspoon vanilla extract, and 2 tablespoons sour cream. Mix until fully combined and creamy. Set aside.
- In a small bowl, toss the 1 1/2 cups diced strawberries with 1 tablespoon granulated sugar. Let them sit for 5-10 minutes to macerate slightly.
- In a shallow bowl, combine the 1/2 cup granulated sugar and 1 1/2 teaspoons ground cinnamon for the coating. Set aside.
- Lay a flour tortilla flat on your work surface. Spoon about 2-3 tablespoons of the cream cheese filling down the center of the tortilla, leaving about a 1-inch border around the edges. Top with 1-2 tablespoons of the sweetened strawberries.
- Fold in both sides of the tortilla, then roll up tightly from the bottom like a burrito. Secure with a toothpick to hold it closed. Repeat with all remaining tortillas and filling.
- In a large skillet, heat about 1/2 inch of vegetable oil over medium heat. To test the temperature, dip the edge of a tortilla in — it should sizzle immediately.
- Working in batches of 2-3, carefully place the chimichangas seam-side down into the hot oil. Fry for about 2-3 minutes per side, turning carefully with tongs, until all sides are deep golden brown and crispy. Adjust the heat as needed to prevent burning.
- Remove the chimichangas from the oil and immediately roll each one in the cinnamon sugar mixture while still hot. Remove toothpicks.
- Serve warm topped with whipped cream or a scoop of vanilla ice cream and a few fresh strawberry slices!