

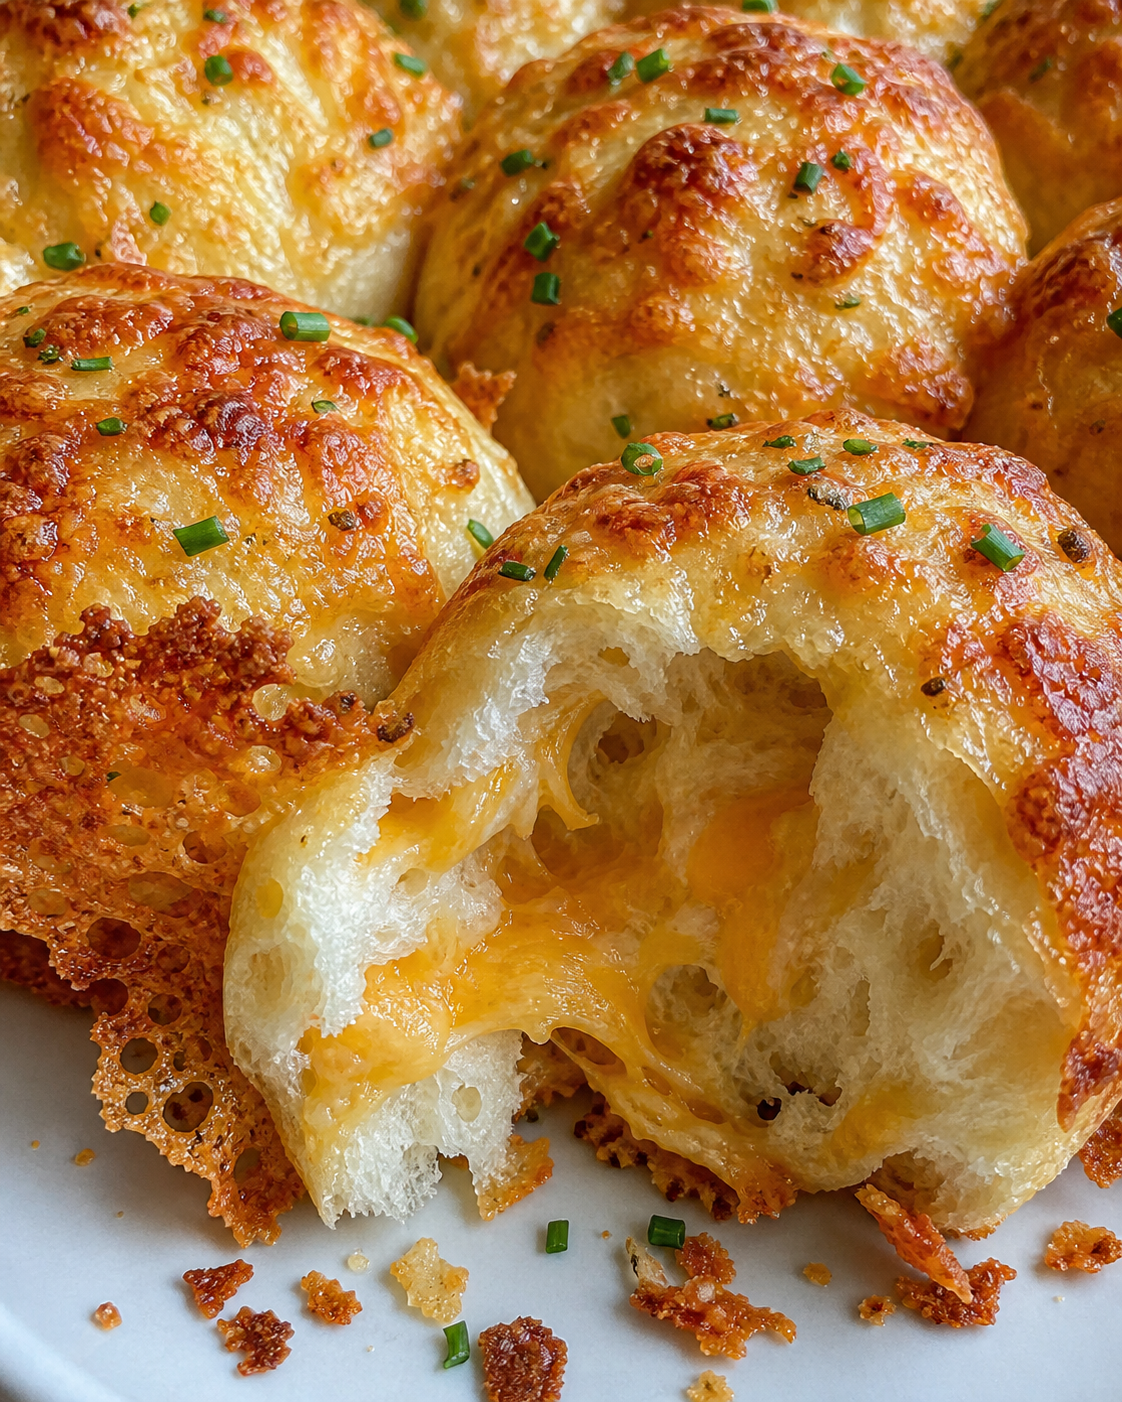
Soft, fluffy, pull-apart buns packed with sharp cheddar cheese — these are the kind of homemade rolls that make everyone at the table go completely quiet for a moment before reaching for a second one!
THE FLUFFIEST, CHEESIEST HOMEMADE BUNS YOU’LL EVER MAKE!
I have been making these Cheddar Cheese Buns for years now, and I am not exaggerating when I say they are one of the most highly requested things I bake in this house. My family literally hovers near the oven when these are in there. The smell alone — that warm, toasty, cheesy aroma filling up the kitchen — is enough to make everyone suddenly very interested in being helpful in the kitchen. I make these several times a month and I never get tired of them.
What I love most is that these buns are surprisingly super simple to pull together, even if you’ve never made bread from scratch before. Yes, there’s yeast involved, but I promise it’s not scary! The dough comes together beautifully, and once you’ve made these once, you’ll be making them on repeat. They’re perfect for weeknight dinners alongside a big bowl of soup or chili, and they absolutely steal the show at holiday tables too.
For a complete meal, I love serving these next to a creamy tomato soup, a slow cooker chili, or even just a simple green salad. They’re also incredible sliced open and stuffed with pulled pork or sandwich fillings — honestly, the options are endless. These buns do serious heavy lifting at the dinner table!
“I made these for Sunday dinner and my husband said they were better than anything from a bakery. I’ve already made them three times this month! My kids ask for them constantly now — this is absolutely a keeper of a recipe. Thank you so much for sharing!
– Melissa”
Frequently Asked Questions
Can I use a different type of cheese?
Absolutely! Sharp cheddar is my personal favorite because it gives you that bold, classic cheesy flavor, but you can swap in Gruyère, Monterey Jack, or a smoked gouda — whatever you prefer! You could even do a blend of two cheeses for extra depth. Just make sure you’re using freshly shredded cheese rather than pre-shredded, because it melts so much better into the dough.
Can I make the dough ahead of time?
Yes, of course! After the first rise, you can punch down the dough, cover it tightly with plastic wrap, and refrigerate it overnight. When you’re ready to bake, let it come back to room temperature for about 30 minutes, shape the buns, let them do their second rise, and bake as directed. It actually makes the flavor even better — a slow cold rise develops a slightly richer taste.
Can I freeze these buns?
Absolutely! These freeze beautifully. Let them cool completely, then place them in a zip-top freezer bag and freeze for up to 2 months. When you’re ready to eat, just thaw at room temperature or pop them in a 300°F oven for about 8–10 minutes to warm them back up. They come out tasting completely fresh — I’m not judging if you make a double batch just to have extras on hand!
My yeast didn’t foam — what went wrong?
This usually means your yeast is either expired or your water was too hot or too cold. You want the water to be between 105°F and 110°F — warm but not hot to the touch, kind of like warm bath water. If your yeast doesn’t get foamy and bubbly after about 5–10 minutes, start fresh with new yeast. It’s a small step, but it’s what makes the buns light and fluffy rather than dense.
How should I store leftover buns?
Store your baked buns in an airtight container or zip-top bag at room temperature for up to 3 days. To keep them soft, you can place a piece of bread in the container with them — it helps maintain moisture. For longer storage, the freezer is your best friend, as mentioned above!
Can I make these into dinner rolls instead of larger buns?
Yes, of course! Just divide the dough into smaller portions — about 1.5 ounces each rather than 3 ounces — and reduce the baking time to about 15–17 minutes, keeping an eye on them. They make the most adorable little cheesy dinner rolls and are perfect for a holiday spread or alongside a big pot of soup.
Can I add mix-ins to the dough?
Absolutely! These buns are super versatile. Chopped jalapeños and cheddar are an incredible combination — think spicy, cheesy perfection. You could also add crumbled cooked bacon, chives, or fresh rosemary for different flavor profiles. Whatever you prefer, just fold your add-ins in at the same time as the cheese.
Ingredients Needed: (See Recipe Card Below for the Full Recipe)
- All-purpose flour — The base of our dough. Bread flour works too if you want a slightly chewier bun with more structure.
- Active dry yeast — This is what makes these buns light, fluffy, and pull-apart perfect. Make sure it’s not expired!
- Warm water — You need this between 105°F–110°F to properly activate your yeast. Too hot and you’ll kill it; too cold and it won’t wake up.
- Whole milk (warm) — Adds richness and tenderness to the dough. You can use 2% milk if that’s what you have on hand.
- Granulated sugar — Just a touch to feed the yeast and add a very subtle sweetness to balance the savory cheese.
- Unsalted butter (softened) — Makes the buns tender and rich. I always use unsalted so I can control the salt level myself.
- Eggs — Two eggs go into the dough for structure and richness, and one beaten egg is used for the egg wash on top.
- Salt — Essential for flavor. Don’t skip it — it makes everything taste better.
- Sharp cheddar cheese (freshly shredded) — The star of the show! Freshly shredded from the block melts better and gives you those gorgeous cheesy pockets throughout the bun.
- Garlic powder — A small amount added to the dough gives a subtle savory depth that takes these buns to the next level.
- Dried parsley (for topping) — Optional, but I love sprinkling a little on top after the egg wash for a pretty, bakery-style finish.

How to Make Cheddar Cheese Buns
Start by activating your yeast. In a small bowl, combine the warm water (105°F–110°F), warm milk, and sugar. Sprinkle the active dry yeast over the top and give it a gentle stir. Let it sit for about 5–10 minutes until it becomes foamy and bubbly — that foam is your sign that the yeast is alive and ready to go. If nothing happens after 10 minutes, your water may have been too hot or your yeast may be old, so it’s worth starting over with fresh yeast.
In the bowl of a stand mixer fitted with the dough hook, combine the flour, salt, and garlic powder. Add the yeast mixture, softened butter, and eggs. Mix on low speed for about 2 minutes until everything comes together into a shaggy dough, then increase to medium speed and knead for about 7–8 minutes until the dough is smooth, elastic, and slightly tacky but not sticky. If you’re kneading by hand, that’ll take about 10 minutes on a lightly floured surface — you want the dough to spring back when you poke it. Now add in the shredded cheddar cheese and knead for another 1–2 minutes just until the cheese is evenly distributed throughout.
Place the dough in a lightly greased bowl, cover with a clean kitchen towel or plastic wrap, and let it rise in a warm spot for about 1 hour to 1 hour 15 minutes, or until it has doubled in size. I like to turn my oven on to its lowest setting for a minute, turn it off, and let the dough rise in there — it creates the perfect cozy, draft-free environment. Once the dough has doubled, punch it down gently to release the air.
Turn the dough out onto a lightly floured surface and divide it into 12 equal pieces — I weigh mine on a kitchen scale for even buns, aiming for about 3 ounces each. Roll each piece into a smooth, tight ball by cupping your hand over the dough and rolling it against the counter in a circular motion. Place the shaped buns in a greased 9×13-inch baking dish, leaving a little space between each one. Cover loosely and let them rise again for another 30–40 minutes, until they’re puffed and touching each other slightly. This second rise is what gives you those incredible pull-apart buns!
While the buns are doing their second rise, preheat your oven to 375°F. Brush the tops of the buns generously with the beaten egg wash — this is what gives them that gorgeous golden color. Sprinkle with a little extra shredded cheddar on top if you like (you do want to — trust me!) and a pinch of dried parsley. Bake for 20–23 minutes, until deep golden brown on top and cooked through. Let them cool for at least 5–10 minutes before pulling them apart — if you can wait that long! Boom — dinner is served!
Pro Tips
- Always shred your own cheese — Pre-shredded cheese is coated in anti-caking agents that prevent it from melting smoothly into the dough. A block of sharp cheddar that you shred yourself makes a huge difference in both texture and flavor.
- Don’t skip the second rise — I know it can feel tempting to rush it, but that second proof is what creates the light, fluffy, pull-apart texture. Give those buns the full 30–40 minutes and you’ll be so glad you did.
- Use a kitchen scale for even buns — If you want all your buns to bake at the same rate and look bakery-perfect, weighing the dough pieces is the way to go. Aim for about 3 ounces per bun.
- Check your yeast temperature — This is the number one reason bread doesn’t rise properly. Invest in a simple instant-read thermometer and take the guesswork out of it completely. It’s a total game changer for baking from scratch.
- The egg wash matters — Don’t skip it! That beaten egg brushed on top is what gives you that gorgeous, deep golden-brown color. Brush it on generously and evenly for the best results.
- Add extra cheese on top — Just before baking, sprinkle a little extra shredded cheddar on each bun. It melts into a golden, slightly crispy cheesy crust on top that is absolutely irresistible.
What to Serve with Cheddar Cheese Buns
These buns are a family favorite alongside so many meals, from casual weeknight dinners to big cozy weekend spreads. Here are some of my favorite pairings:
- Creamy Tomato Soup — My absolute personal favorite pairing. The cheesy buns practically beg to be dunked.
- Slow Cooker Chili — A bowl of hearty chili next to a warm cheddar bun is the definition of comfort food.
- Broccoli Cheddar Soup — Double the cheese, double the happiness. This combination is incredible on a cold night.
- Pulled Pork — Slice the buns in half and pile them high with saucy pulled pork for the best sandwiches of your life.
- Simple Green Salad — A crisp, lightly dressed salad balances out the richness of the buns beautifully for a nutritious, balanced meal.
- Scrambled Eggs and Bacon — Yes, these work for breakfast too! Serve them warm alongside a classic breakfast spread for something truly special.
However you serve them, I have a feeling these buns are going to become a staple in your home just like they are in mine — enjoy every single bite!
Cheddar Cheese Buns
Ingredients
Method
- In a small bowl, combine the warm water, warm milk, and sugar. Sprinkle the yeast over the top, stir gently, and let sit for 5–10 minutes until foamy and bubbly.
- In the bowl of a stand mixer fitted with the dough hook, add the flour, salt, and garlic powder. Mix briefly to combine.
- Add the foamy yeast mixture, softened butter, and 2 eggs to the flour mixture. Mix on low for 2 minutes until a shaggy dough forms, then increase to medium speed and knead for 7–8 minutes until smooth and elastic.
- Add 1 ¼ cups of the shredded cheddar cheese to the dough and knead on low for 1–2 minutes until the cheese is evenly incorporated throughout.
- Place the dough in a lightly greased bowl, cover with plastic wrap or a clean kitchen towel, and let it rise in a warm spot for 1 hour to 1 hour 15 minutes, until doubled in size.
- Punch down the risen dough and turn it out onto a lightly floured surface. Divide it into 12 equal pieces (about 3 ounces each). Roll each piece into a smooth ball.
- Place the shaped buns in a greased 9x13-inch baking dish. Cover loosely and let rise for 30–40 minutes, until puffed and touching slightly.
- Preheat the oven to 375°F. Brush the tops of the buns generously with the beaten egg wash. Sprinkle with the remaining ¼ cup shredded cheddar and dried parsley if using.
- Bake for 20–23 minutes until deep golden brown on top and cooked through. Let cool in the pan for at least 5–10 minutes before serving.


I would like to make these and take them camping. How do these reheat?
These reheat really well — just wrap them in foil and warm them by the campfire or on a camp stove for a few minutes and they come out soft and delicious. They also taste pretty great at room temperature if you don’t want to fuss with reheating while you’re out there enjoying nature.